


Pinned Items
Recent Activities
-
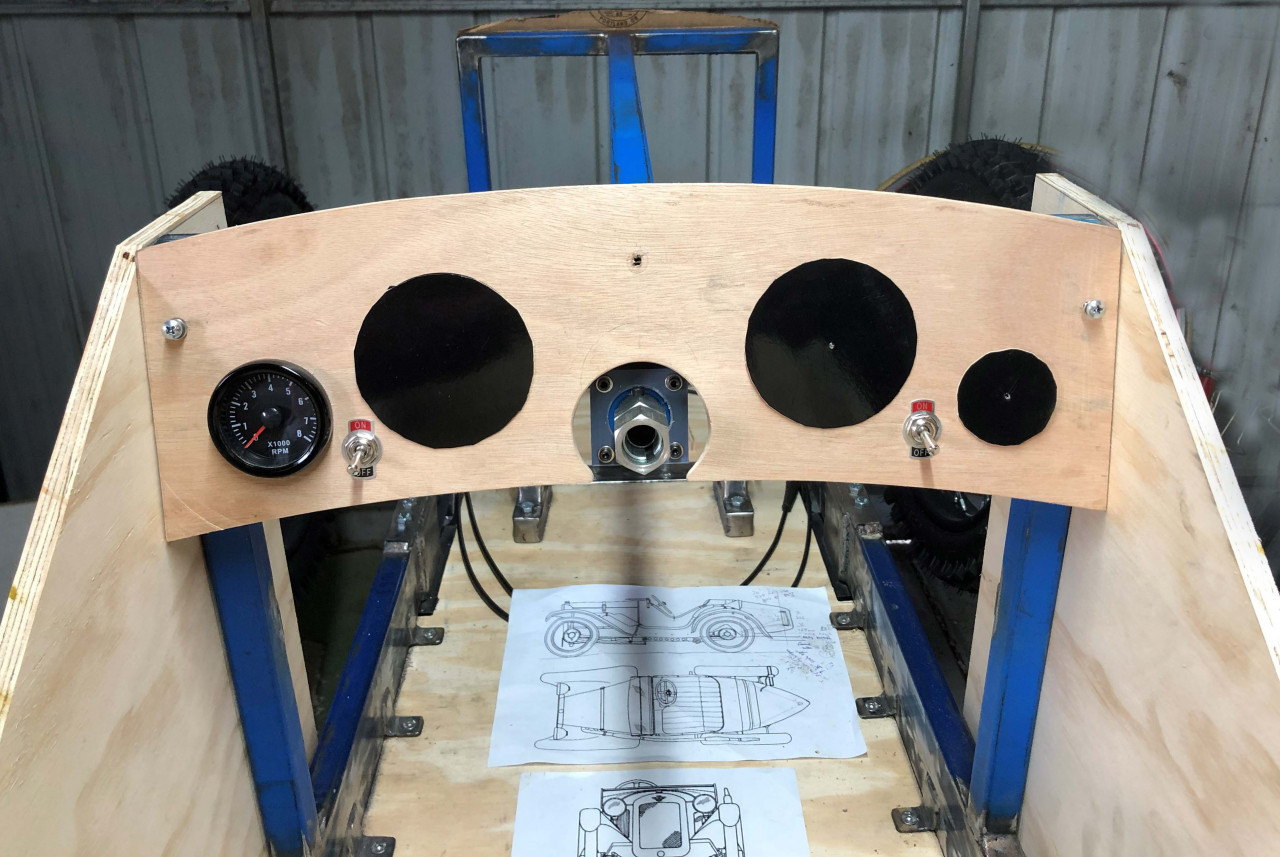
MrBugatti commented on this post about 1 year agoI've done my dash! Well, populated it, at least. Now just got to paint it and get the instruments working.
Have fun
Simon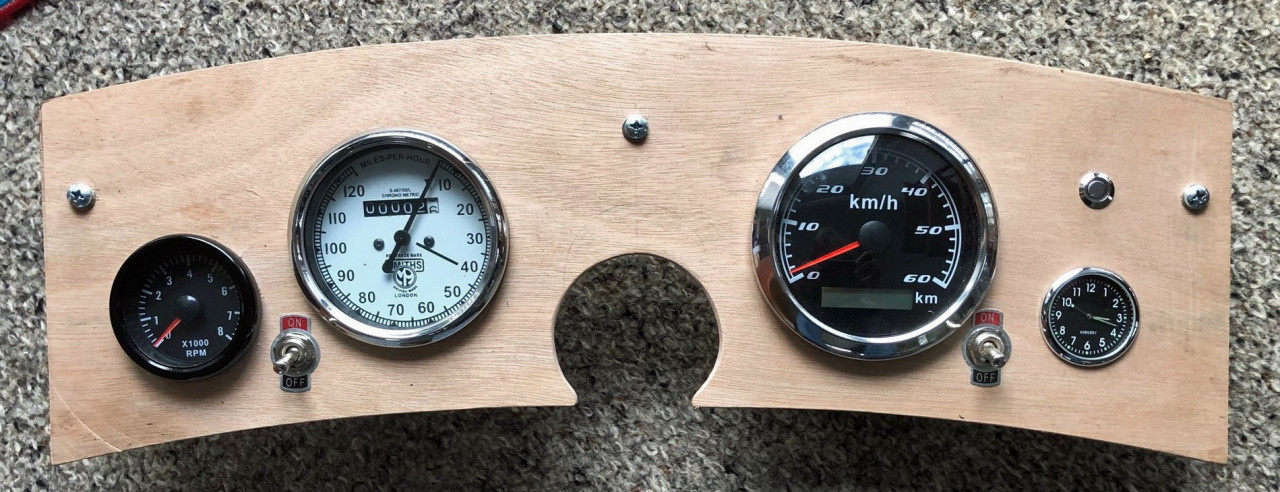 Post is under moderationStream item published successfully. Item will now be visible on your stream.
 -
Mick commented on this post about 1 year agoHad a great suggestion from Graham Mcintyre on facebook to use a Molotow chrome marker pen to render the badge metallic. This is my test piece. I think it's worked well.
Simon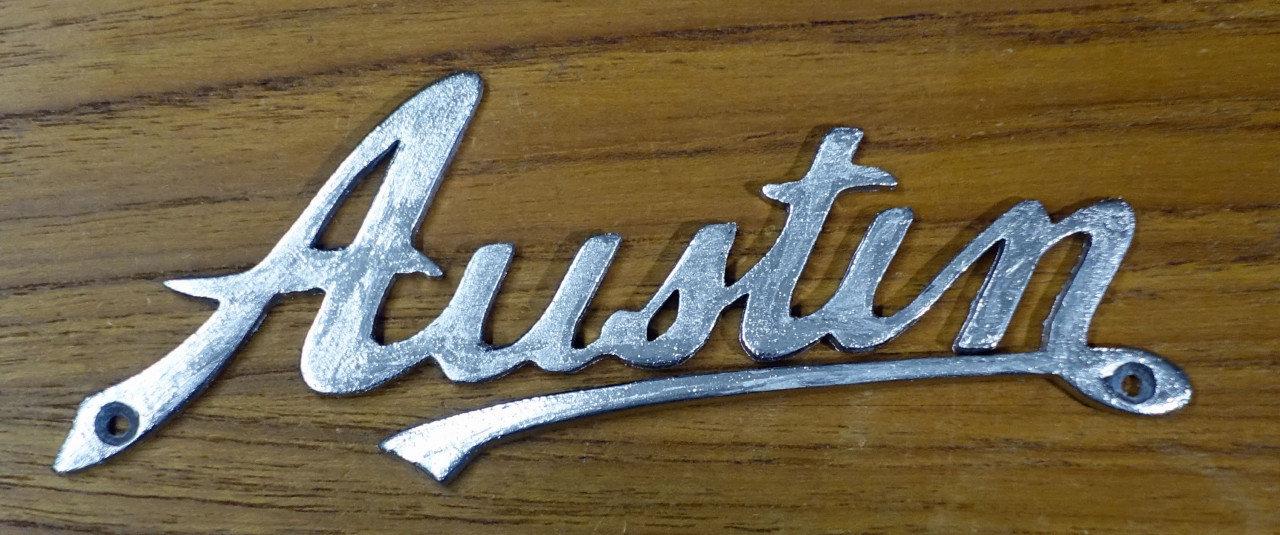 Post is under moderationStream item published successfully. Item will now be visible on your stream.
 -
Geoff reacted to this post about 1 year ago... lifted a 2D image from a photo on the web, converted it to a 3D svg file in "Convertio" (free software), put it into TinkerCad (also free) to make it 5mm high and 160mm wide and to add the two 3mm high joiners, then printed it in PLA on my trusty old Creality 10 - a four hour print. I'll give it a light sand and then paint it in silver /...... lifted a 2D image from a photo on the web, converted it to a 3D svg file in "Convertio" (free software), put it into TinkerCad (also free) to make it 5mm high and 160mm wide and to add the two 3mm high joiners, then printed it in PLA on my trusty old Creality 10 - a four hour print. I'll give it a light sand and then paint it in silver / aluminium paint and maybe it will pass muster from a distance.More
Have fun
Simon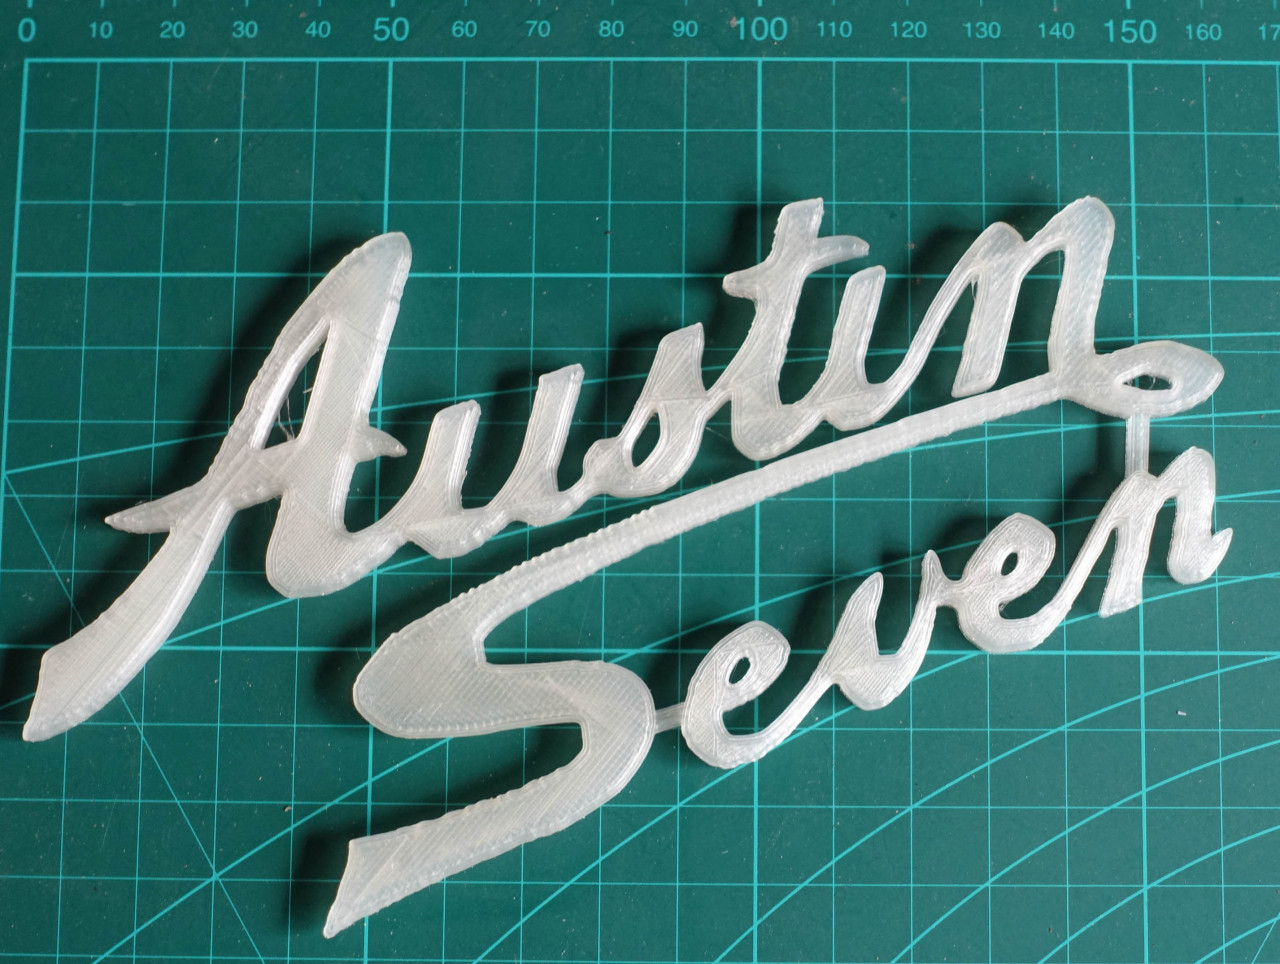 Post is under moderationStream item published successfully. Item will now be visible on your stream.
 -
Mick commented on this post about 1 year ago
 The need to drive the half-completed cyclekart is irrepressible and may not be denied!
Oh and yes - it felt like there's way too much toe-in on the front wheels and now I can see that's obvious.
Have fun!
SimonComments (3)-
 Awesome!!!!! Always the best feeling when you get a project running.
Is that an 'Arooooga' horn I spy on the front? A 12V gel alarm battery will More ... -
Thanks Mick. It felt absolutely awesome.
After this video, I reduced the toe-in and beefed up the steering rod bearings, just because.
Yes, More ... -
You are most welcome. My mum used to say 'I am a mine of useless information', lol.
I used to have a similar horn on my Kombi but it was a bit low More ...
Post is under moderationStream item published successfully. Item will now be visible on your stream. -
-
Mick reacted to this post about 1 year ago
Very close to having a running chassis, now. Just have to fit the front axle and wheels, and bleed the brake ... then should be able to drive the bare chassis around the block!
Have fun!
Simon
Post is under moderationStream item published successfully. Item will now be visible on your stream. -
Mick commented on this post about 1 year agoOccasionally, you get one of those moments when a few things you've been working on for while come together nicely ... and it all fits. Well, the keys fit the keyways I cut on the axle I made, the wheel adapters, disc adapter and sprocket adapter all fit on their respective keys - and they all seem to be in the right place. So I'm a little...Occasionally, you get one of those moments when a few things you've been working on for while come together nicely ... and it all fits. Well, the keys fit the keyways I cut on the axle I made, the wheel adapters, disc adapter and sprocket adapter all fit on their respective keys - and they all seem to be in the right place. So I'm a little chuffed - maybe a little drink tonight!More
Have fun!
Simon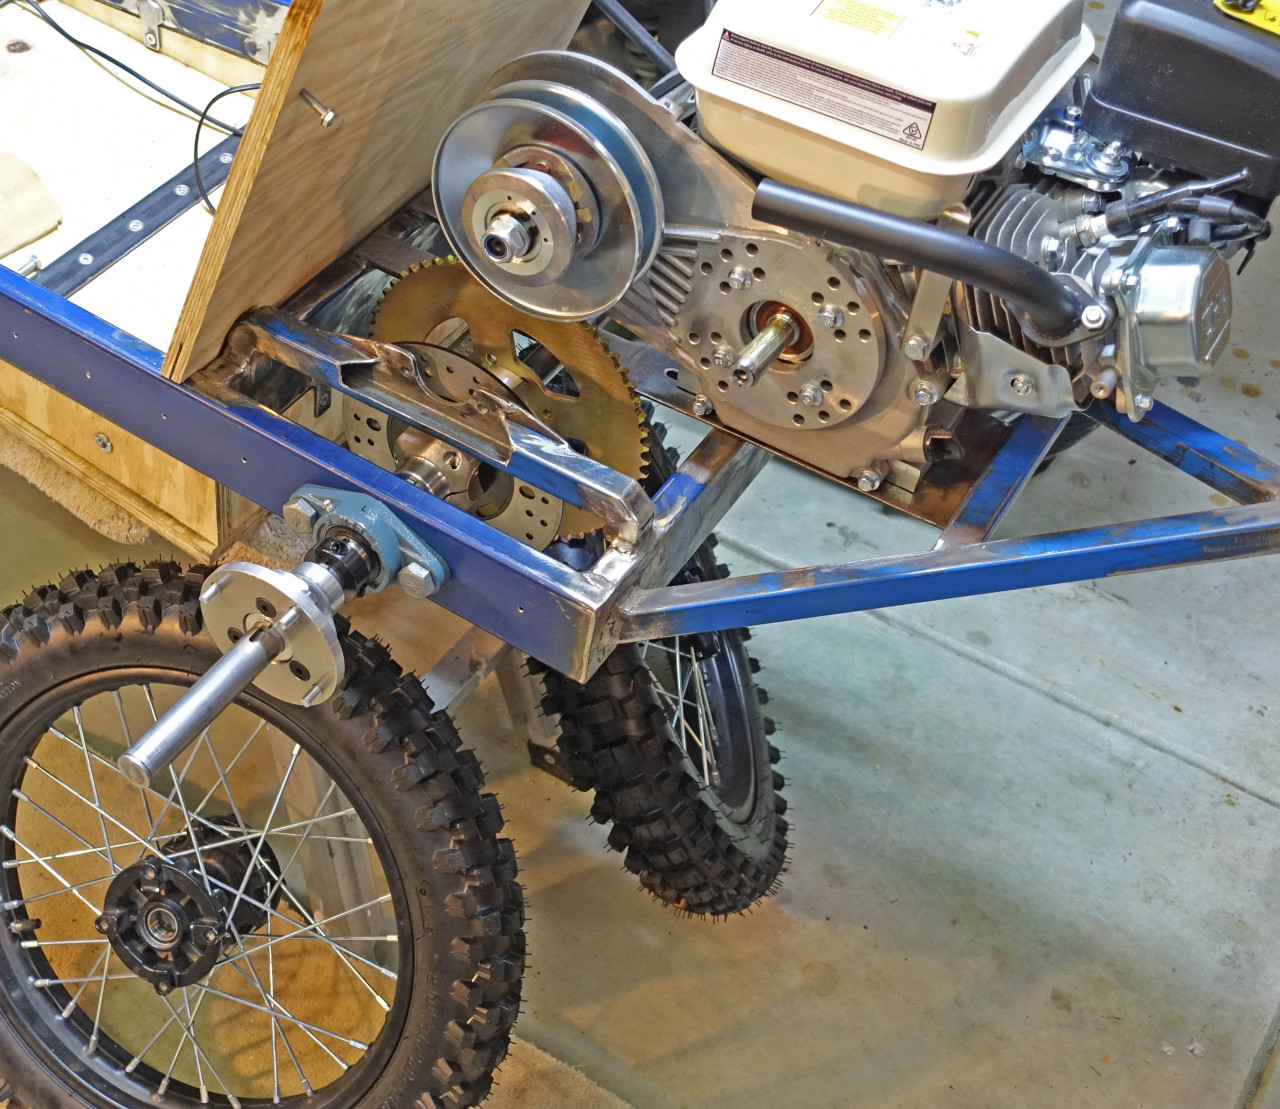 Comments (1)
-
Looking really good Simon. Everything seems to have come together nicely.
Post is under moderationStream item published successfully. Item will now be visible on your stream. -
-
Stream item published successfully. Item will now be visible on your stream.
-
Mick commented on this post about 1 year ago
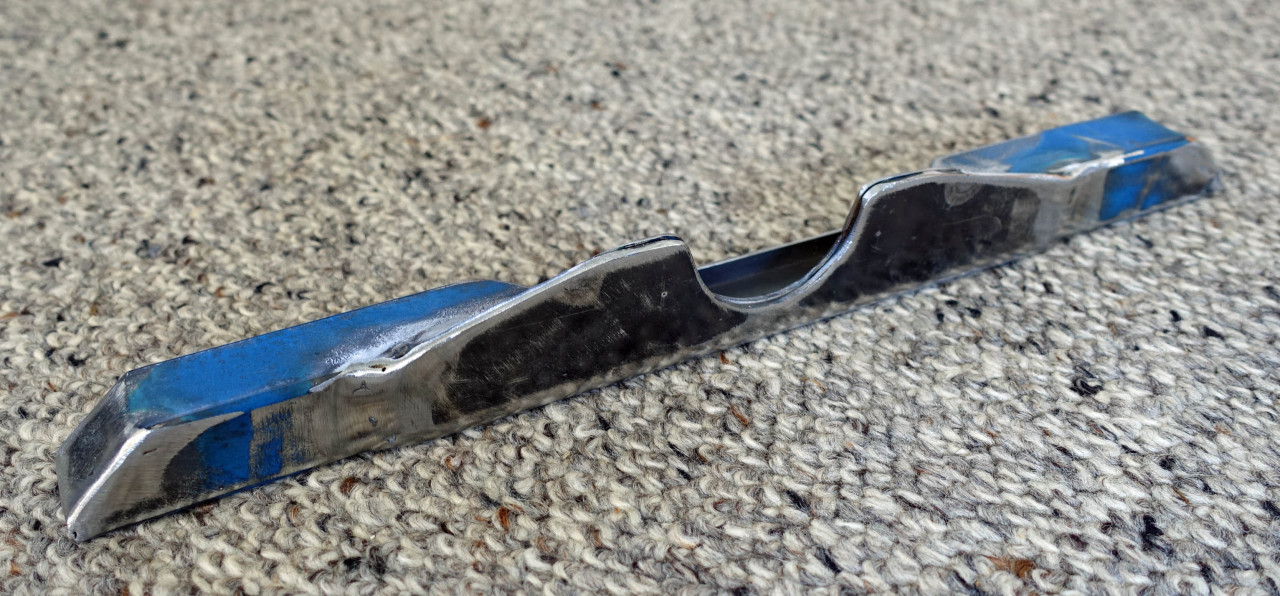
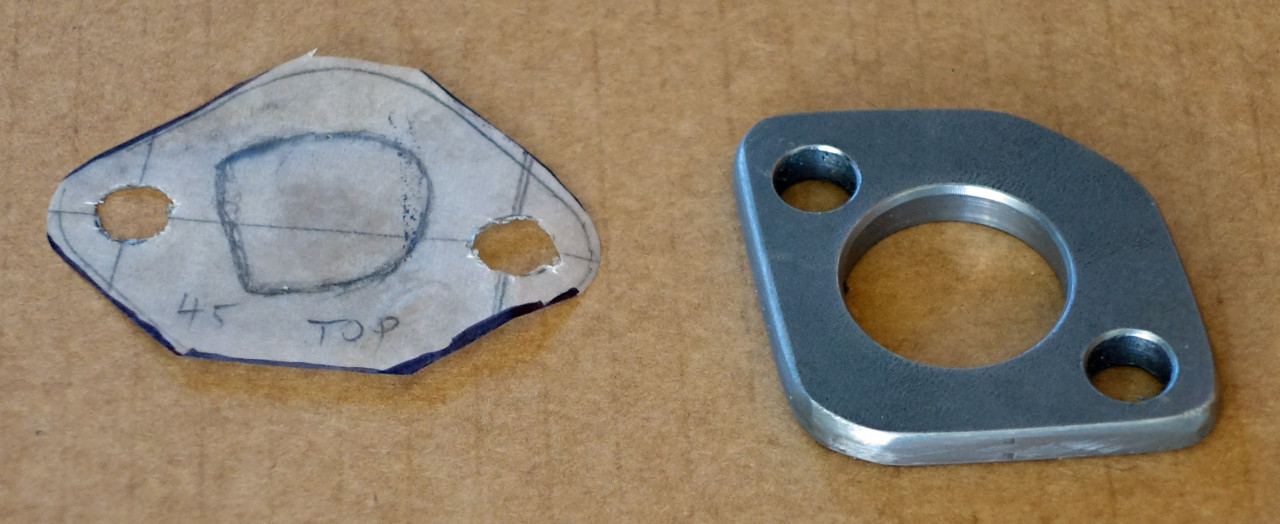
Also made an exhaust flange for my GX200 clone. I hope to use use the flange with some 25mm pipe to connect to the following exhaust pipe and muffler and hopefully, have a real side exhaust and fishtail.Comments (1)
-
I have the same setup on the diesel heater for my Camper. It's not Webasto but a similar clone. I can take a measurement of the diameter if you need More ...
Post is under moderationStream item published successfully. Item will now be visible on your stream. -
-
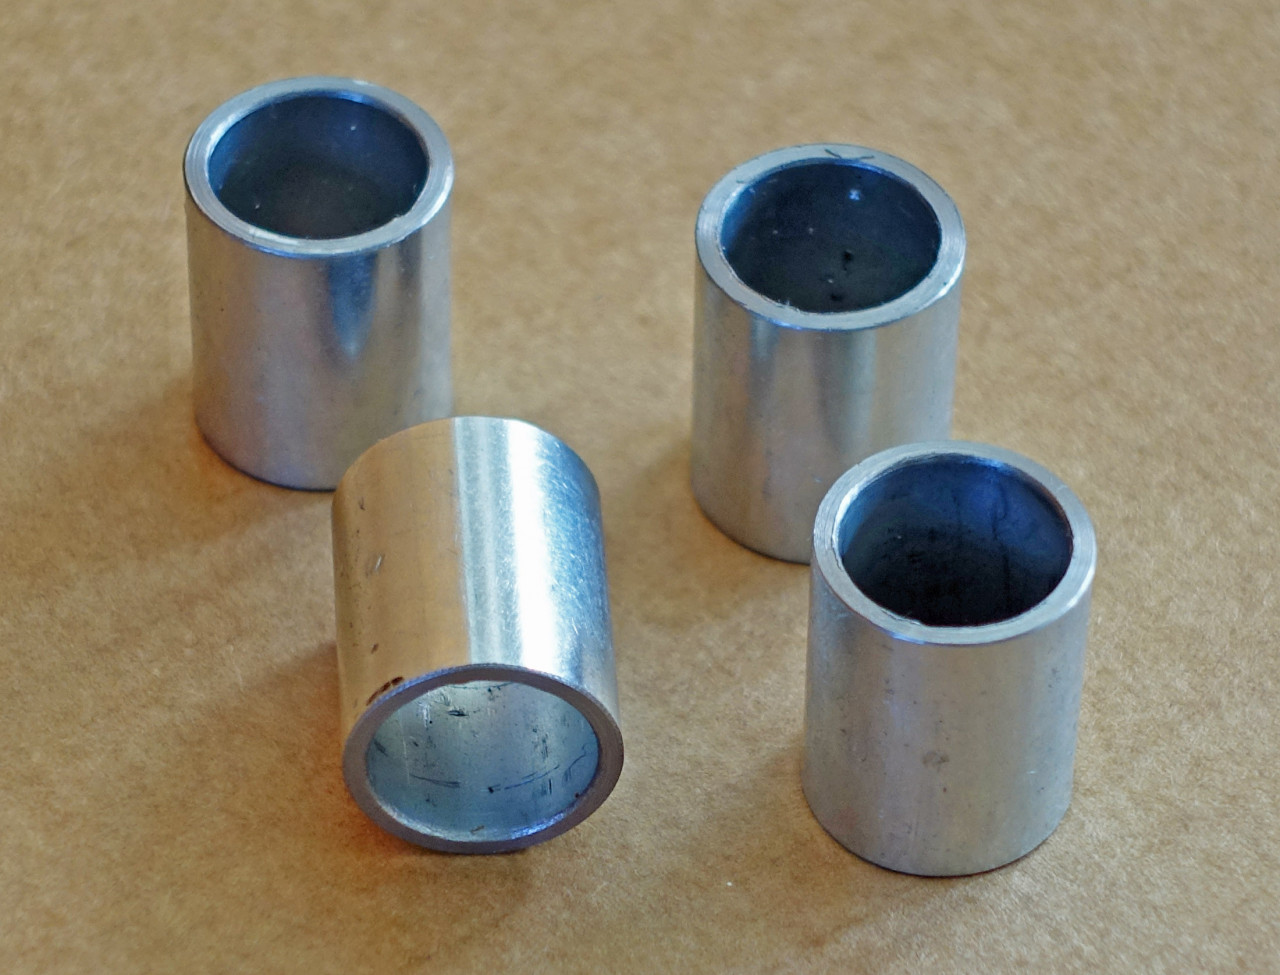
MrBugatti reacted to this post about 1 year agoMade crush tubes for the M16 bolts securing the axle's pillow bearings to the 25x75 frame. The hole in the frame for these bolts is only wide enough for the crush tube on one side ... hope that's an acceptable approach.
Simon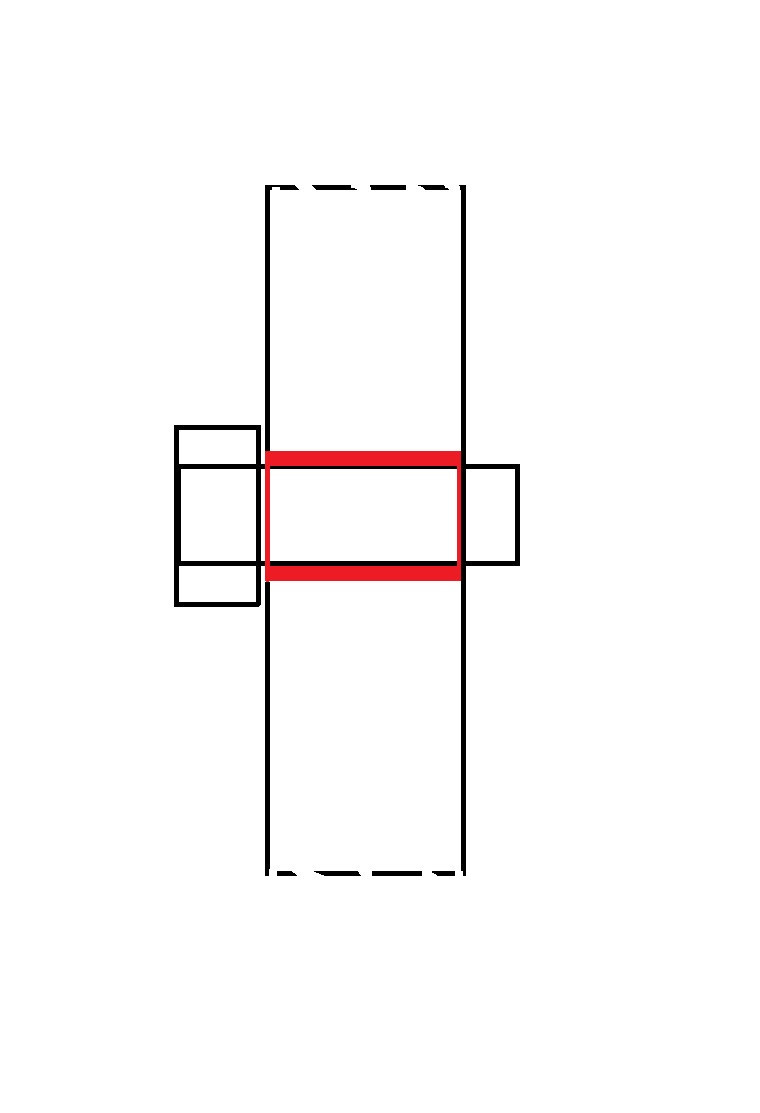
 Post is under moderationStream item published successfully. Item will now be visible on your stream.
 -
A good friend keeps a fair bit of stainless oddments - so I was able to fine some 19.5mm I.D. / 22.5mm O.D. tube - not a fantastically common size? Anyway, perfect for the bearing spacers on my front wheels, which use a 3/4" or 19.05mm axle spindle. These spacers are sometimes called "crush tubes" but you do not crush them. They are...A good friend keeps a fair bit of stainless oddments - so I was able to fine some 19.5mm I.D. / 22.5mm O.D. tube - not a fantastically common size? Anyway, perfect for the bearing spacers on my front wheels, which use a 3/4" or 19.05mm axle spindle. These spacers are sometimes called "crush tubes" but you do not crush them. They are necessary to ensure that the bearings do not suffer a lateral stress from tightening the spindle nut, which would otherwise break or wear them in a very short time. I just turned off square ends at 82.5mm long, to suit my 16" Pit bike wheels - just a bees tit longer than the gap between the bearing bosses in the hub.More
Might make some further progress on my flyscreen today, too.
Simon
Have fun!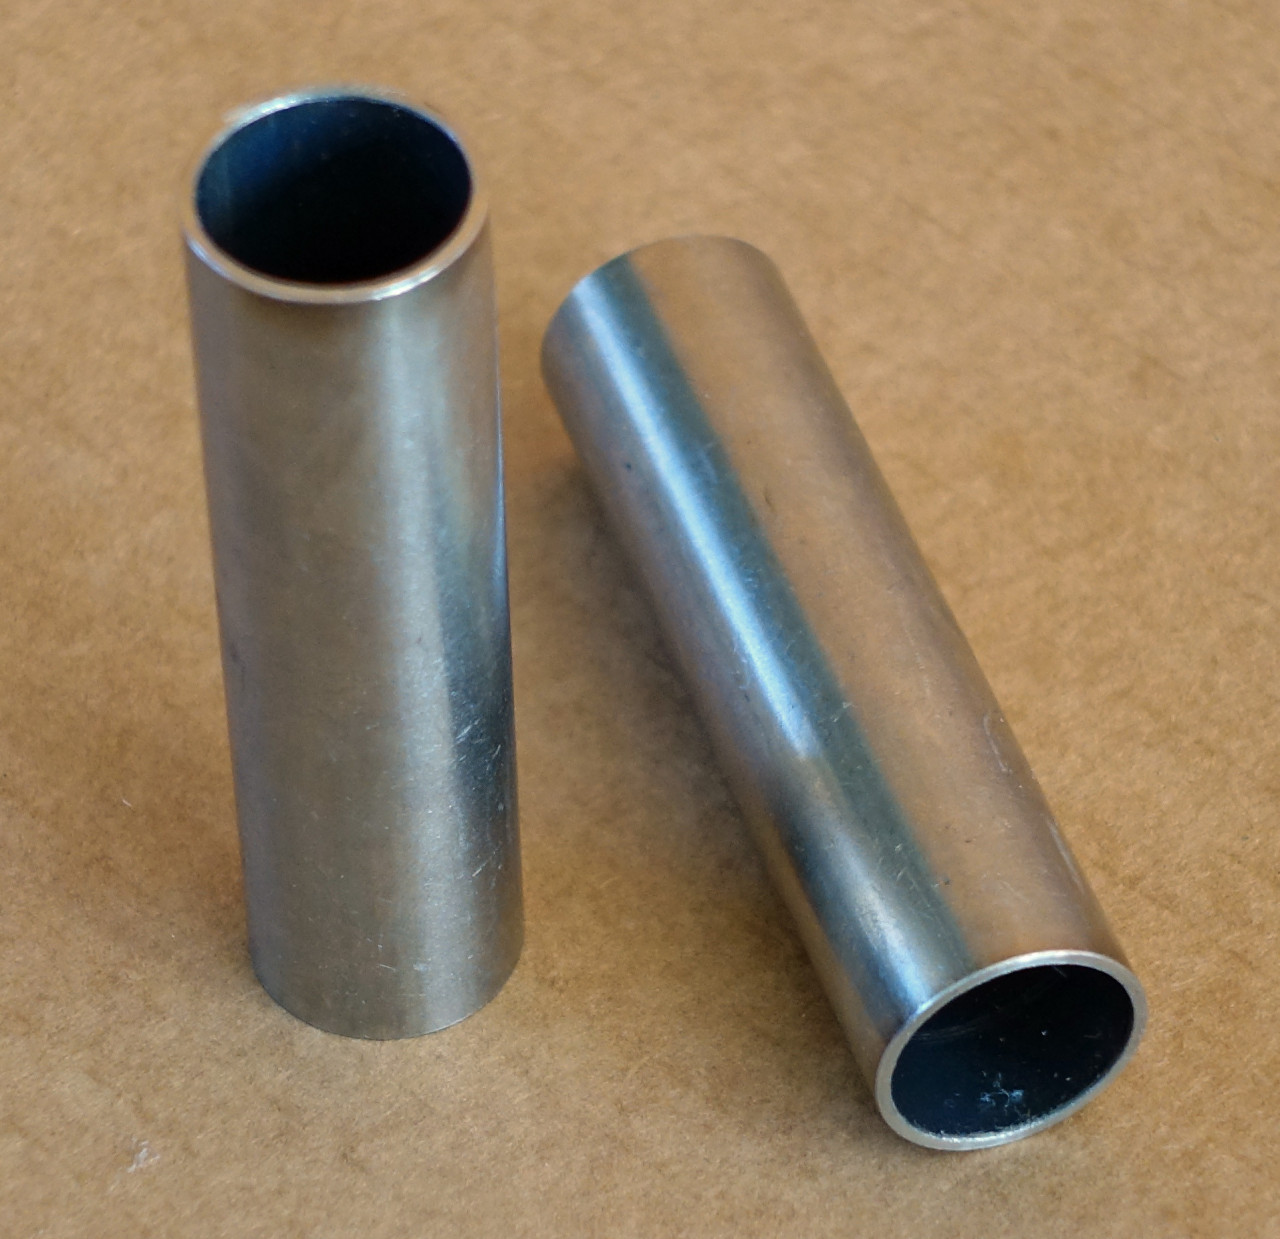 Post is under moderationStream item published successfully. Item will now be visible on your stream.
 -
Brilliant and informative further discussion, Mick. Thank you!
SimonPost is under moderationStream item published successfully. Item will now be visible on your stream. -
Geoff reacted to this post about 2 years agoOK, so this is the mock-up of how I hope the Flyscreen will work (made with 10mm square - I still have to get the channel).
The brass ends that fit inside the tube will have small indents on their faces, in two positions that correspond to the two angles at which the screen may be set - and the mounting brackets will have small raised...OK, so this is the mock-up of how I hope the Flyscreen will work (made with 10mm square - I still have to get the channel).More
The brass ends that fit inside the tube will have small indents on their faces, in two positions that correspond to the two angles at which the screen may be set - and the mounting brackets will have small raised portions to engage with the indents.
10x10x1.5mm channel will be attached to the tube with a dozen or so self tappers (even this mock-up with just two screws is very strong). I have some 3mm and 6mm clear plexiglass and will decide which works best in a frame made of the channel - frame will be on bottom and sides only. Also need to decide whether to use silicon or rubber C-trim to surround the plexiglass.
Have fun
Simon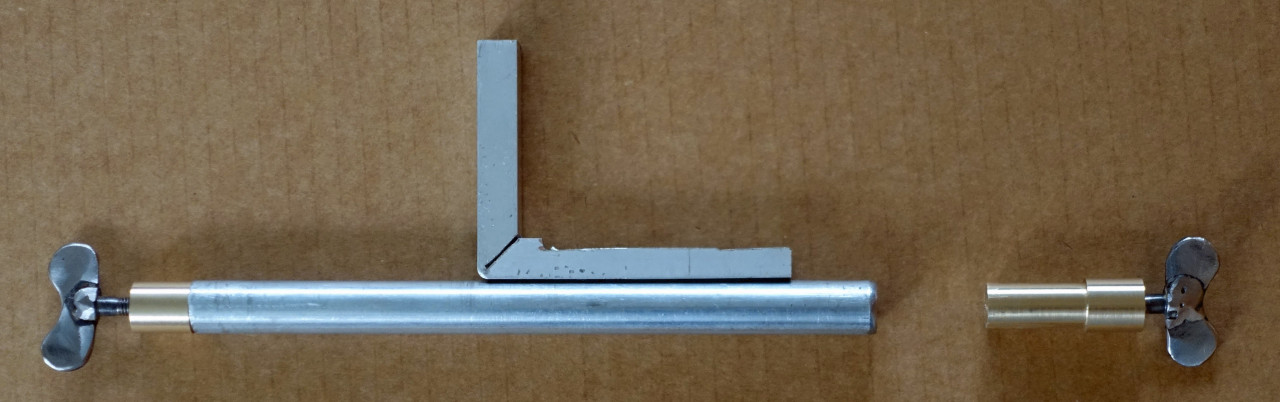 Comments (1)
-
I like it. Nice design. Brass is also one of those materials I think looks just right on this kind of build too. Very Authentic. The young'uns call More ...
Post is under moderationStream item published successfully. Item will now be visible on your stream. -
-
Stream item published successfully. Item will now be visible on your stream.
-
Mick commented on this post about 2 years agoYou don't have to be crazy to build a Cyclekart - but it sure helps. I spent just over an hour making these wing-bolts - which will be part of the windscreen brackets for the Ulster. Oh, and I came up with the design for the adjustable brackets in my sleep last night!
Have fun!
Simon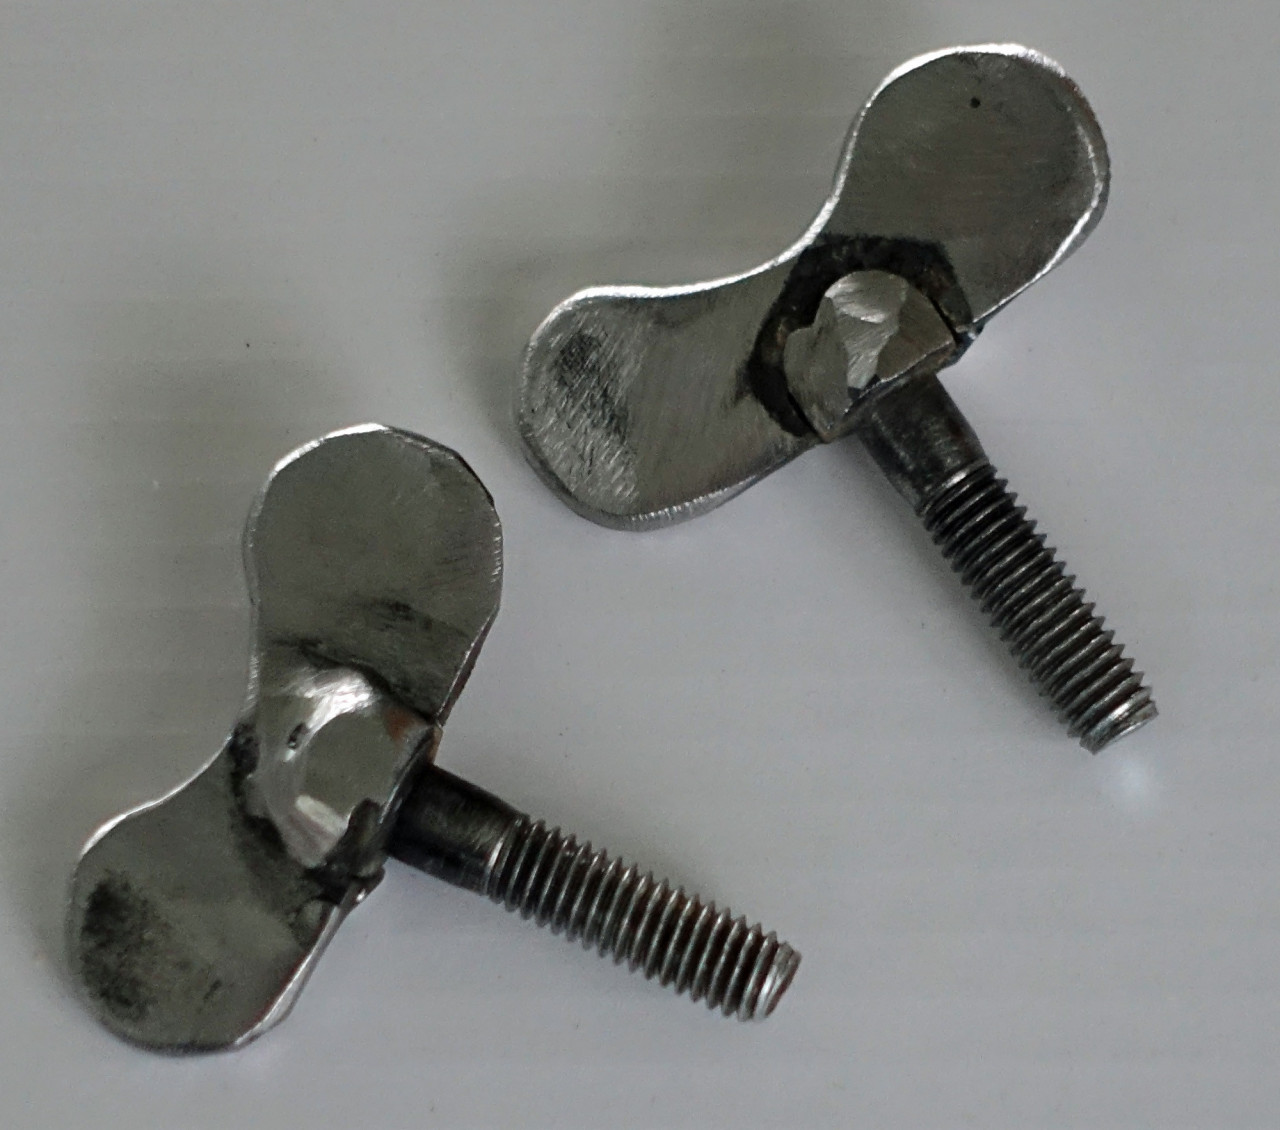 Comments (3)
-
Are these for a fly screen? I've had pretty good success in the past making up frames using the aluminium 'U' channel from Bunnings. Clarke rubber do More ...
-
Yep, for a screen like this car has: https://longinwakula.artstation.com/projects/nABOo
I already had figured to use Bunnings 10x10x1.5 aluminium More ... -
Love that rendering. Looks awesome.

Post is under moderationStream item published successfully. Item will now be visible on your stream. -
-
Simonism commented on this post about 2 years ago
 Comments (2)
-
Looks great. It's amazing what those little lathes can do.
-
True. And I have surprised myself!
Post is under moderationStream item published successfully. Item will now be visible on your stream. -
-
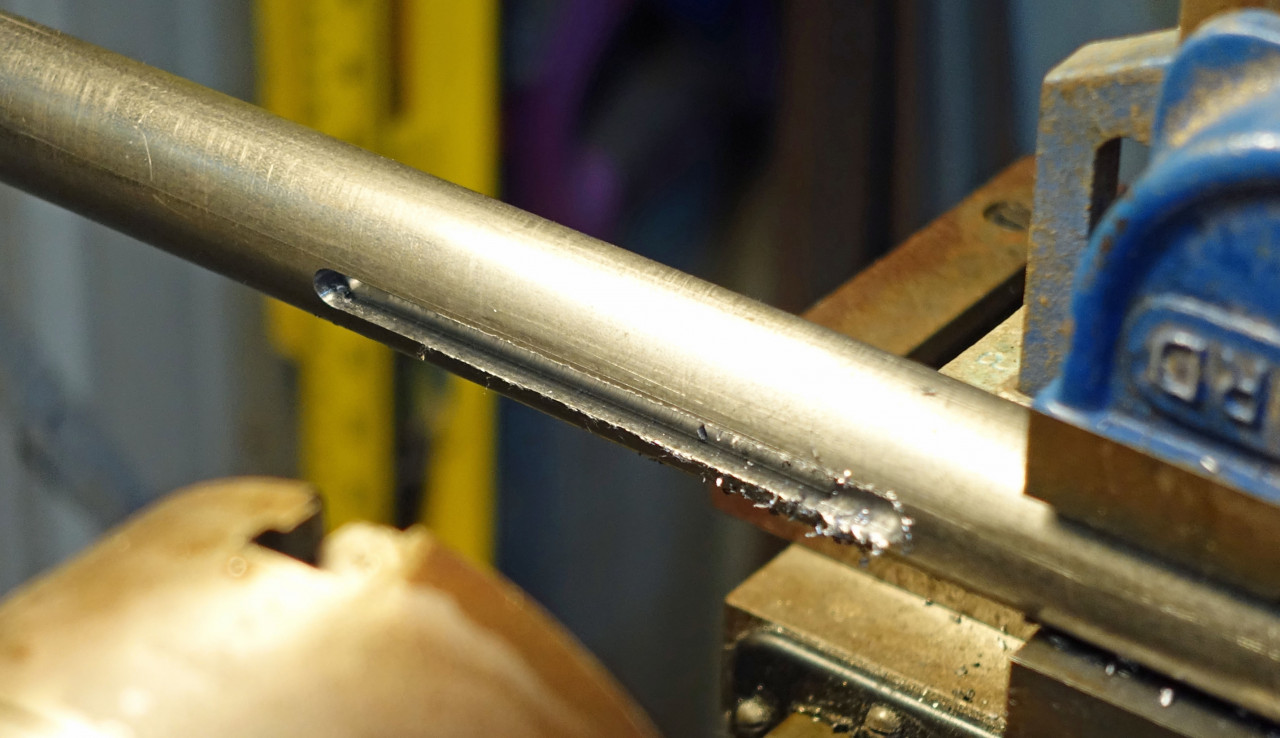
Mick commented on this post about 2 years ago
No more putting it off!! So just had to start cutting the 6mm keyways in my 25mm axle. Seems to be working - two runs taking 1.6mm each time for a depth of 3.2mm.
Have fun!
SimonPost is under moderationStream item published successfully. Item will now be visible on your stream. -
Stream item published successfully. Item will now be visible on your stream.
-
Simonism commented on this post about 2 years agoGetting it together - bit-by-bit. Engine, mount and torque converter are pretty much done; floor pan is done; pedals, throttle and cable, master cylinder, calliper mount and hose are done; seat is done; side bodywork is prepped and test fitted (much more bodywork to come later); steering, steering shaft and detachable wheel are done; wheels are...Getting it together - bit-by-bit. Engine, mount and torque converter are pretty much done; floor pan is done; pedals, throttle and cable, master cylinder, calliper mount and hose are done; seat is done; side bodywork is prepped and test fitted (much more bodywork to come later); steering, steering shaft and detachable wheel are done; wheels are done (hubcaps to come later); dash is done (instruments and ignition switch to come later).More
Last big thing to do to get rolling is to shorten the 25mm axle stock down to 1020mm long and cut four 6mm keyways each 77mm long and two circlip grooves. This will take some care! Then put everything together properly and test drive. Then pull it all apart again and paint it. Oh, so much to do, so much to do!
Oh ... and I fit in it, too!
Excuse the photo-shopped picture - trying to hide my mess!
Have fun!
Simon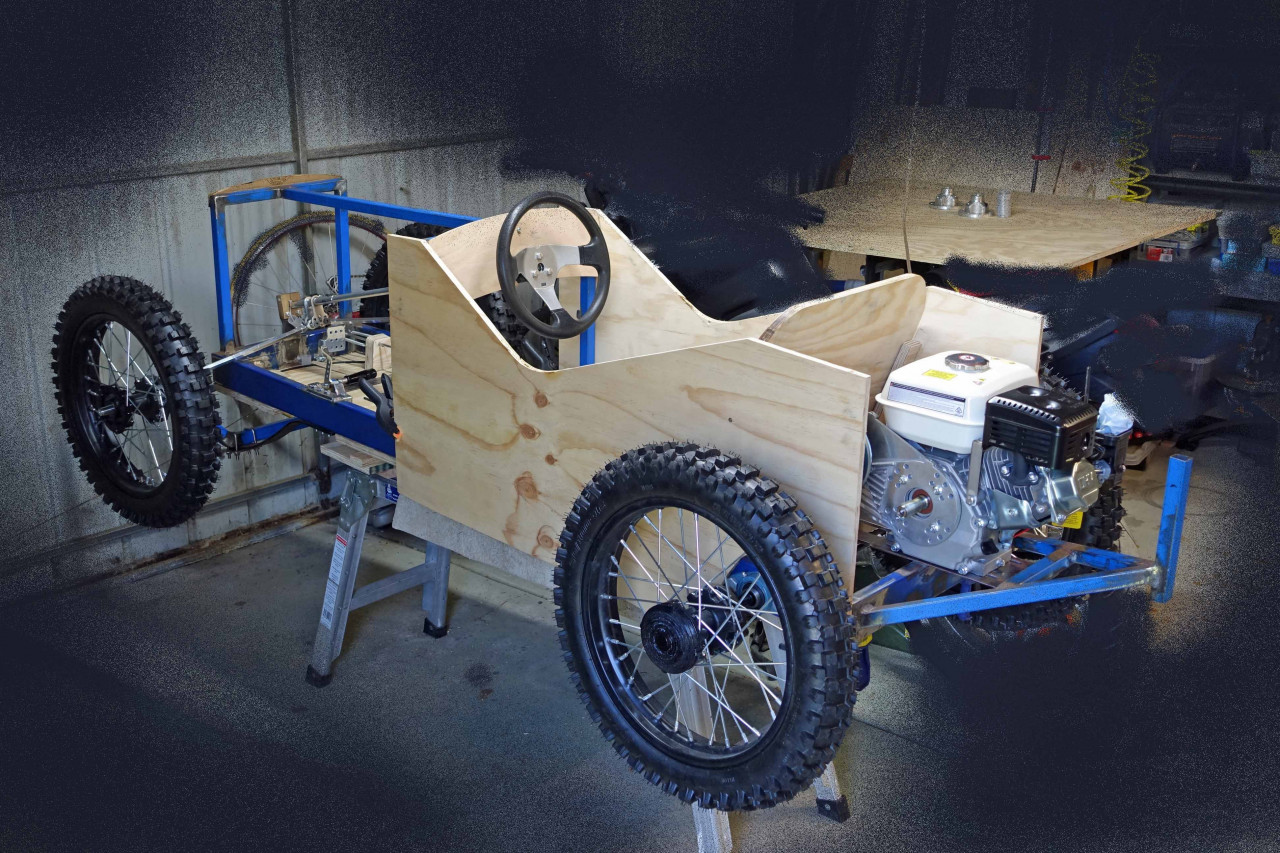 Comments (3)
-
Awesome work. Have you taken it for a spin yet?

-
Mick ... Still lots of little things to set up before I trust my bum in it!
-
Just noticed your 'kart trestle' - what a great idea. I have one of those kind of ladders. Going to steal that idea
 when i get back on to mine.
Post is under moderationStream item published successfully. Item will now be visible on your stream. -
-
Simonism commented on this post about 2 years agoIt may not seem like much, but figuring out how to thread 6mm stainless will enable me to make the brake and throttle actuators. Woo hoo!
More to come later.
Have fun!
Simon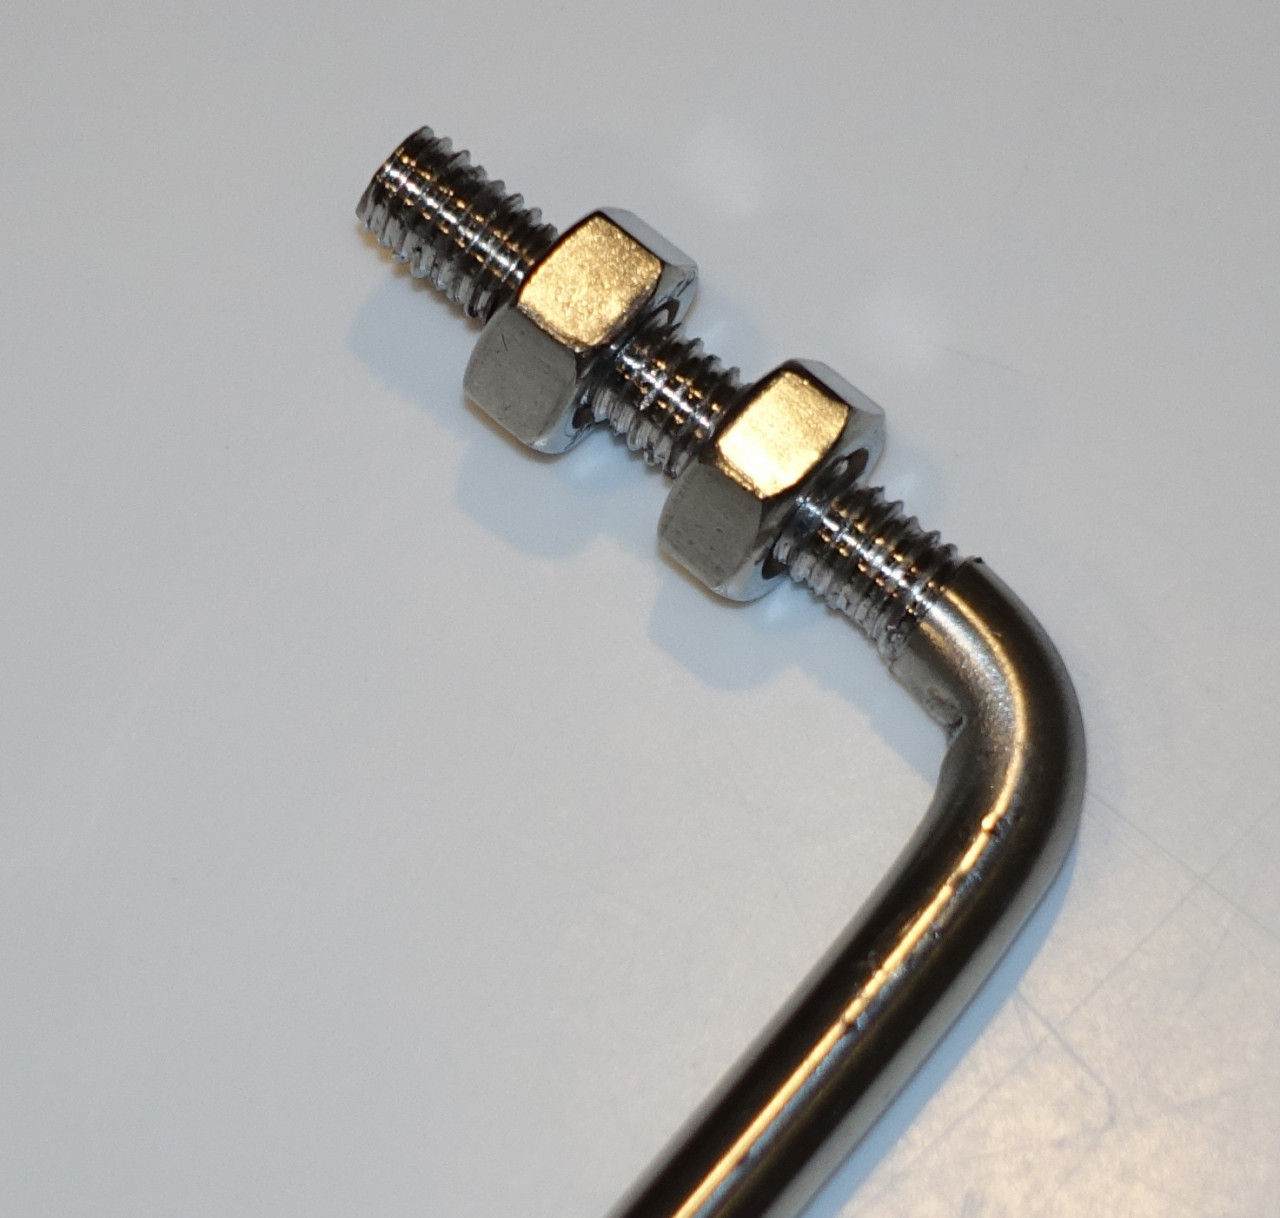 Comments (4)
-
Nice job. Stainless can be a bit hard to work with. Did you turn it or use a die?
-
I used a die, Mick. At first, the rod was turning in the vice. But making the 90degree bend first and using that bend to stop the rod rotating More ...
-
Good job . Came out nice.
One trick, depending on the die you have is to wind the middle screw in to open the die up a little to start the thread More ... -
Thanks Mick. So much to do and way too much to learn. (Haha, which is why I've embarked on this project!)
Post is under moderationStream item published successfully. Item will now be visible on your stream. -
-
Mick commented on this post about 2 years agoAnother 3D print! This time a rough (low resolution) test print of a kind of hub cap for my pit bike wheels. Should be OK when printed a bit finer.
Have fun!
Simon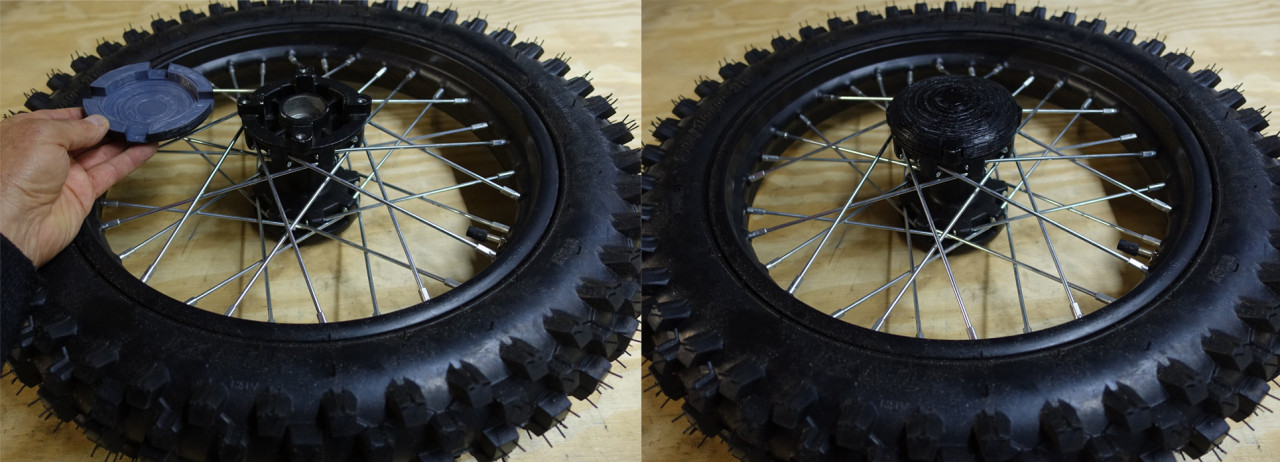 Comments (2)
-
Great idea!
-
I've used acetone to smooth out ABS prints before. works quite well. You can also sand and paint them quite successfully.
We made up some centre More ...
Post is under moderationStream item published successfully. Item will now be visible on your stream. -
-
Follow our Facebook page and connect with other Cyclekartistes
-
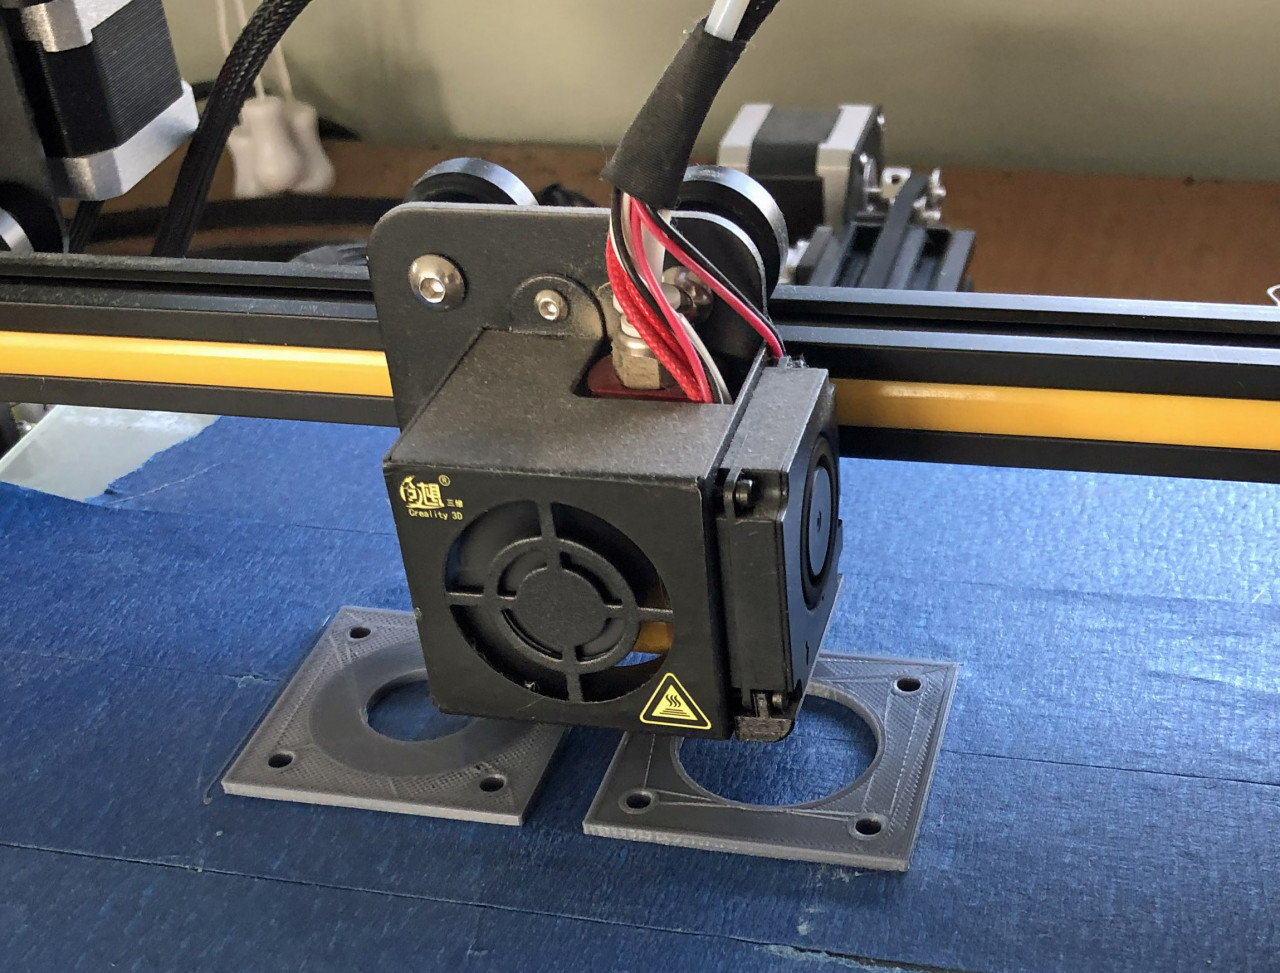
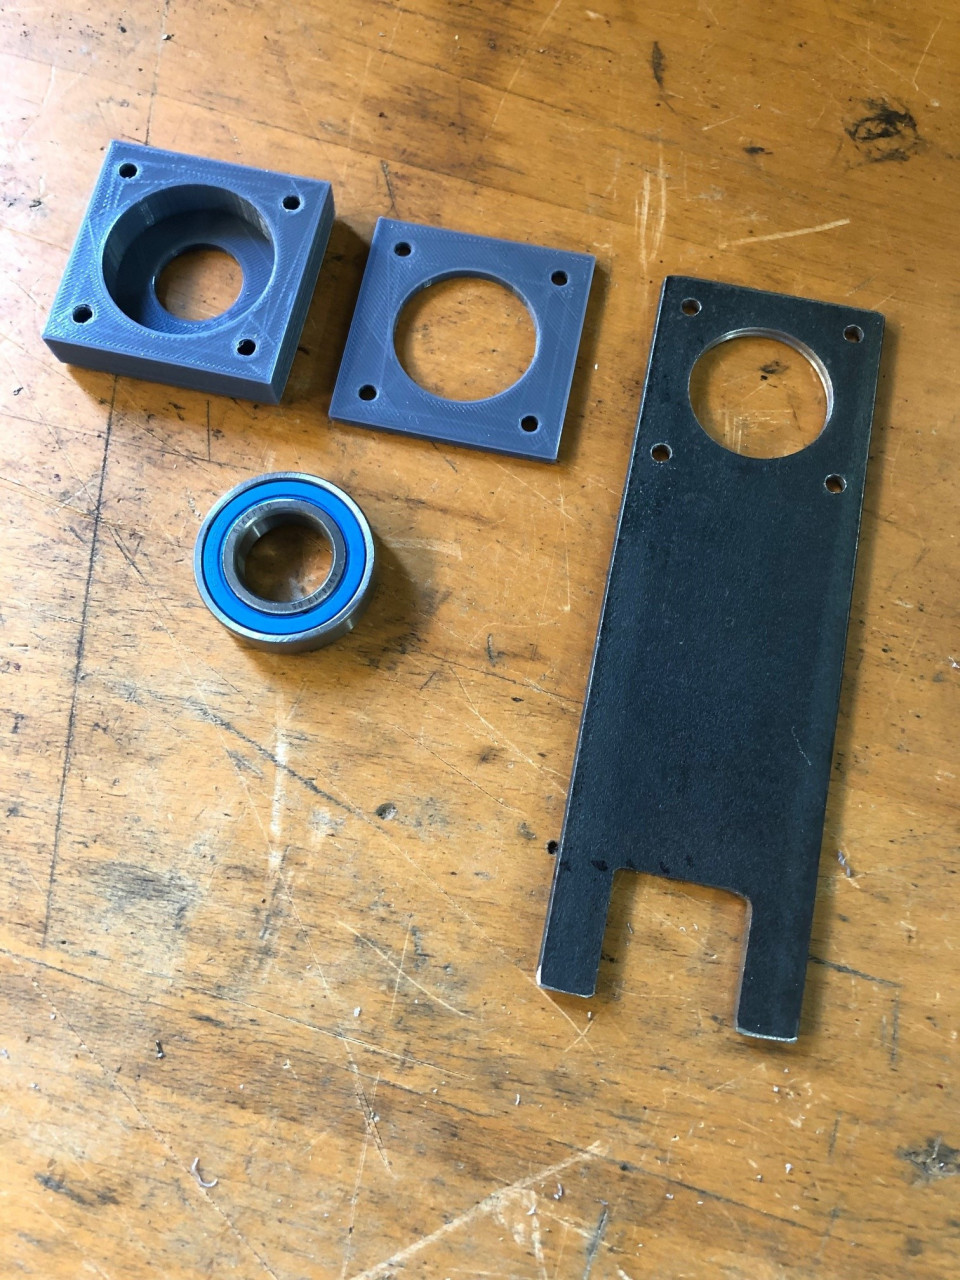
Mick commented on this post about 2 years agoAlso, I used TinkerCad to design a 3D printed bearing holder for my top steering bearing. Hahaha, I made the bottom bearing holder out of wood.
Anyway, quite happy with this one.
Having fun!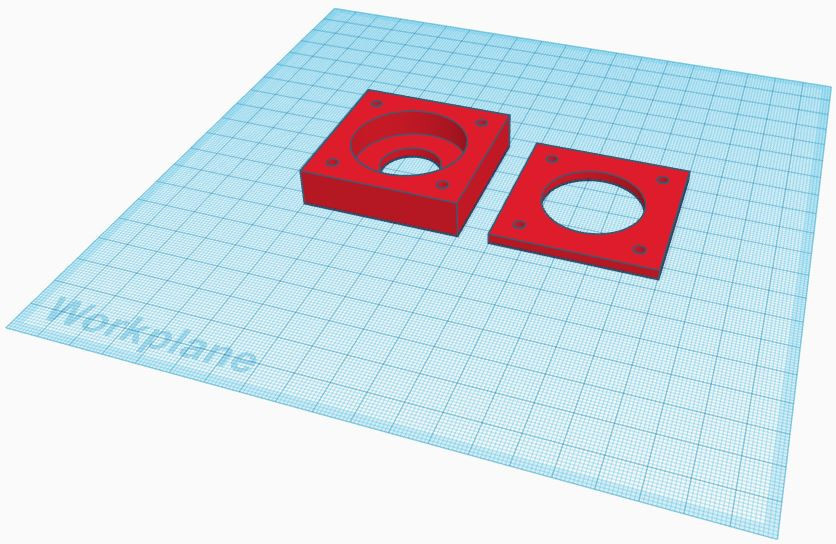
 Comments (2)
-
 I'm impressed with the holder for the bearing. Keep up the good work.
 -
Great to see real world uses for 3D printing. It's perfect for stuff like this.
Post is under moderationStream item published successfully. Item will now be visible on your stream. -
-
Stream item published successfully. Item will now be visible on your stream.
-
Mick commented on this post about 2 years agoGetting there slowly.
Cut and glued my floor pan (to be set 75mm off the bottom of the frame rails, at the "deep end") ... and fabbed some weld-on tabs to bolt it to the frame, using 6mm bolts and captive Tee nuts.
Proved again that you can't have too many clamps.
Have fun!
Simon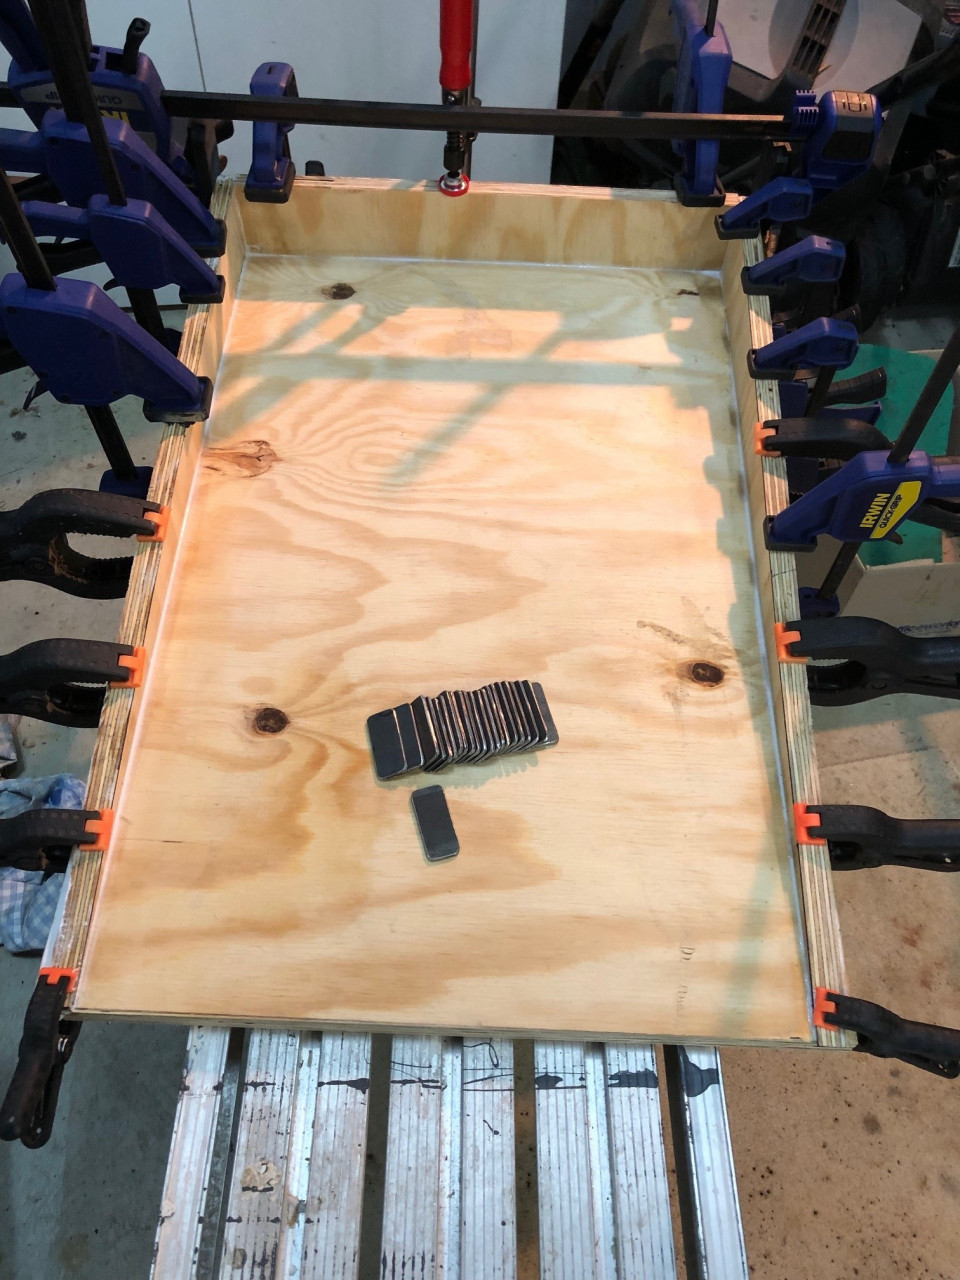 Comments (1)
-
Looks like full steam ahead. I really need to pull my finger out, you guys are way ahead of me now

Post is under moderationStream item published successfully. Item will now be visible on your stream. -
-
Simonism commented on this post about 2 years agoBought some 6mm stainless for brake (and maybe throttle) actuator/s (2m for $10). Fabbed the pedal mounts. Nothing takes quick!
Have fun!
Simon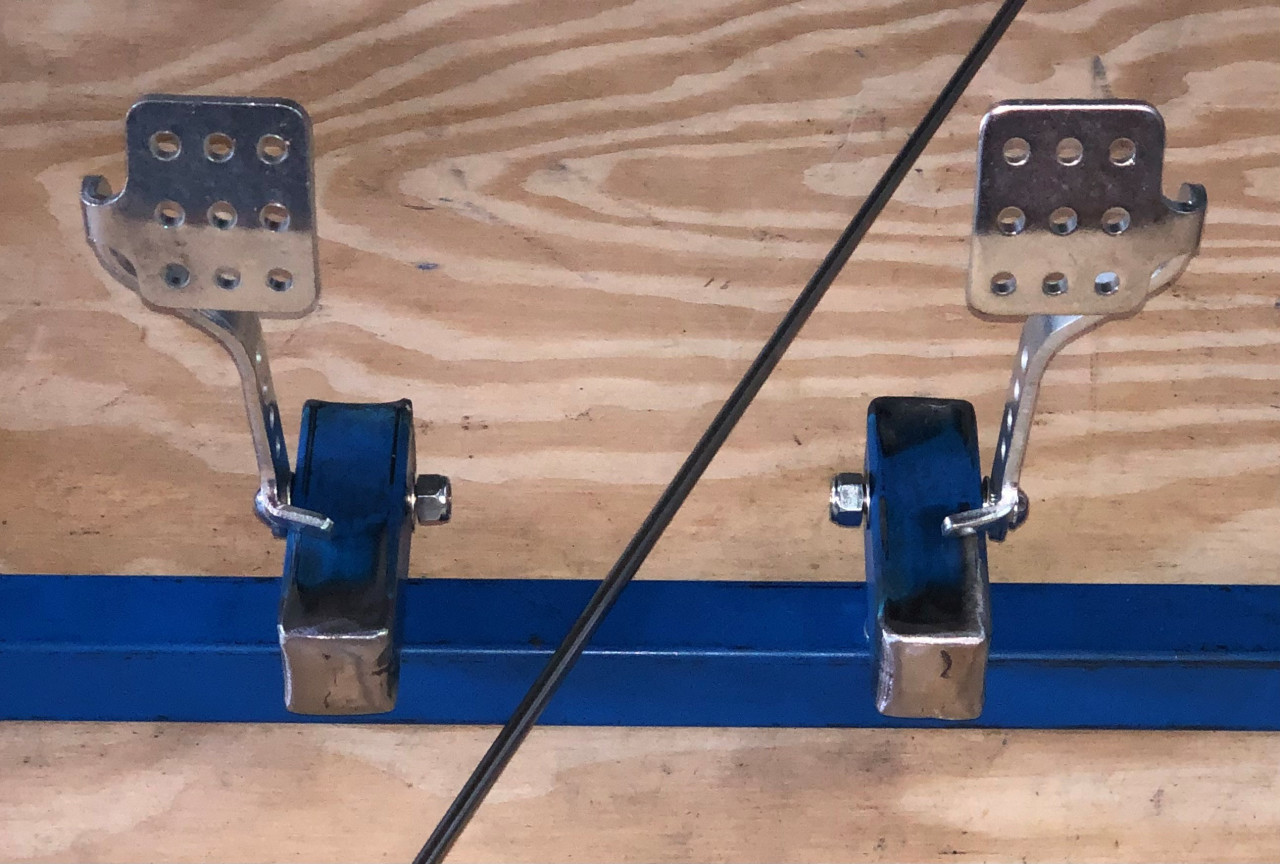 Comments (5)
-
They look great. Any chance you could share a couple more pictures to get more of an idea how you made the mounts?
-
Geoff - the mounts are simple. They are just a short length of 25x25x1.6 square tube, with the ends folded over and welded closed, then the welds More ...
-
Thanks mate.
-
I agree those look the business.
Are you running a hydraulic brake? I got a regular hydraulic brake for mine but the 'hose' is too short so I More ... -
Yes Mick. Maybe a 6mm disc is overkill? It's brake kit is from CPR. Here's my install mock-up. I thought about getting a longer hose but you've More ...
Post is under moderationStream item published successfully. Item will now be visible on your stream. -
-
Mick reacted to this post about 2 years agoToday, I moved on to the engine mount. Not finished yet, so pictures will come later ....
Should have a rolling chassis in a month or two.
Have fun!
SimonPost is under moderationStream item published successfully. Item will now be visible on your stream. -
Geoff reacted to this post about 2 years agoI think (I'm not certain, but just maybe) my fabrication and welding skills have advanced from absolute rock bottom to total noob!
Today, I finished the disc brake calliper carrier ....
Have fun!
Simon
 Post is under moderationStream item published successfully. Item will now be visible on your stream.
 -
Mick reacted to this post about 2 years agoReceived these nice steel collars from RS-Components for $13 each, with free shipping if you spend enough.
Have fun!
https://au.rs-online.com/web/p/shaft-collars/6918128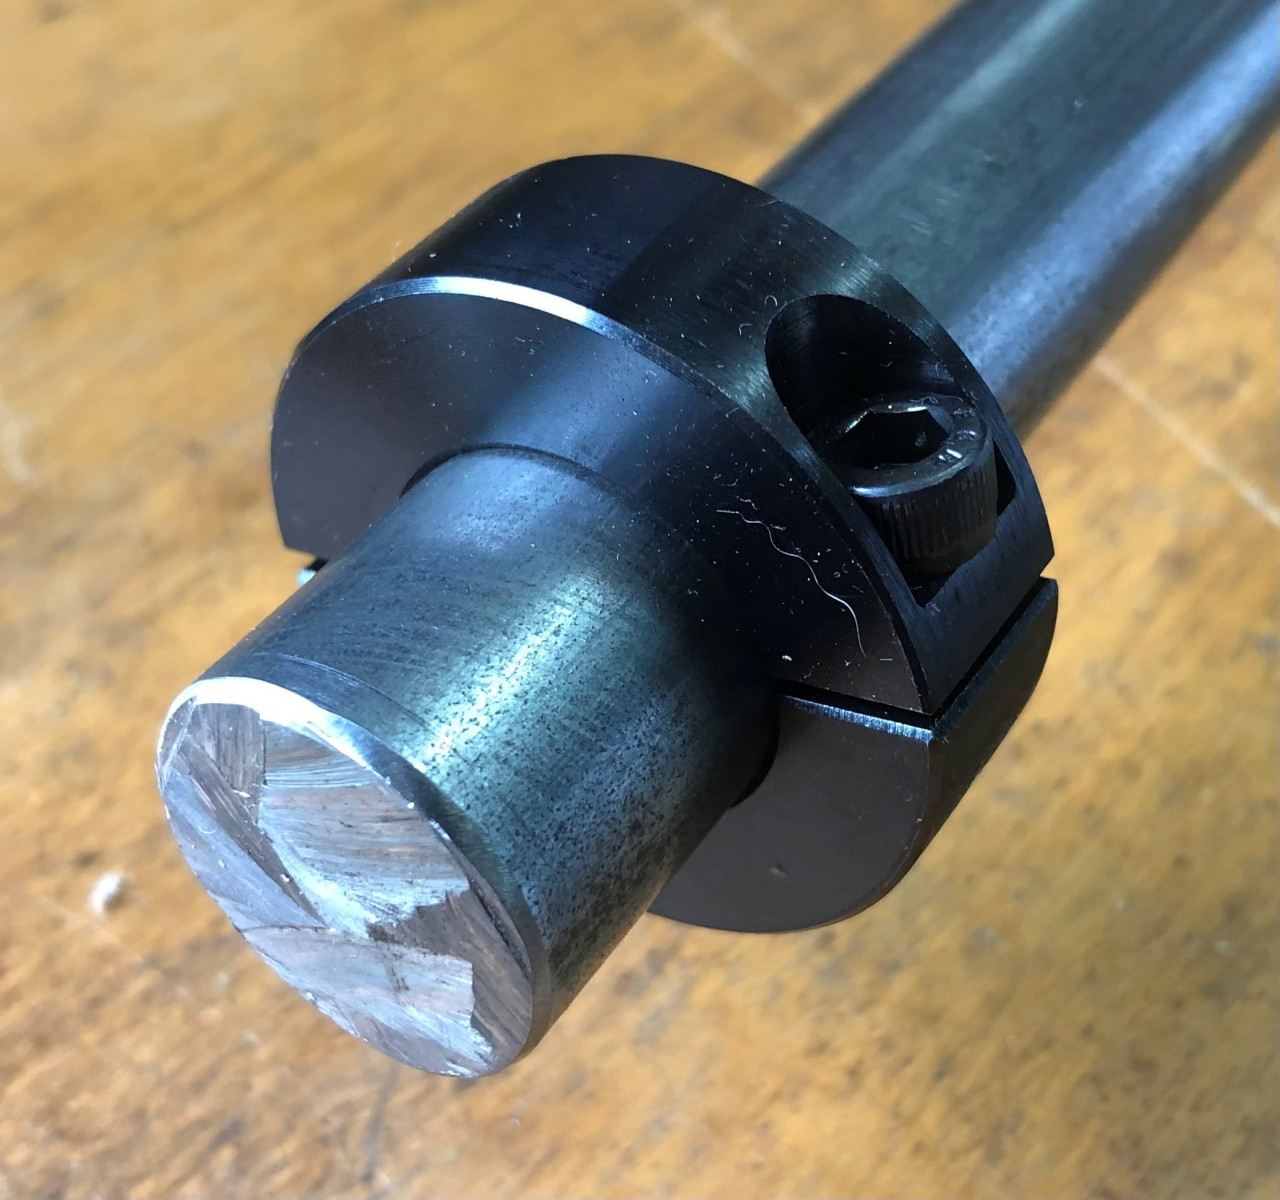 Post is under moderationStream item published successfully. Item will now be visible on your stream.
 -
Stream item published successfully. Item will now be visible on your stream.
-
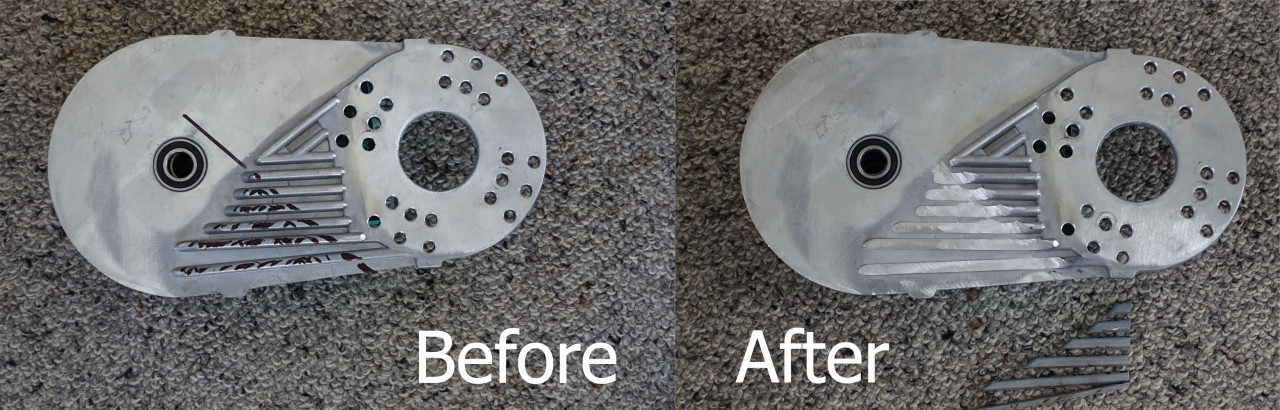
Mick commented on this post about 2 years agoIt seems my torque converter backplate was a "left hand" version when I needed a "right hand" one (or maybe vice versa?). Anyway, with the torque converter disposed the way I want it, I had to shave the backplate reinforcements a bit, to allow a nice path for the chain. I'll let you know if this causes the backplate to self-destruct under...It seems my torque converter backplate was a "left hand" version when I needed a "right hand" one (or maybe vice versa?). Anyway, with the torque converter disposed the way I want it, I had to shave the backplate reinforcements a bit, to allow a nice path for the chain. I'll let you know if this causes the backplate to self-destruct under load!More
Have fun!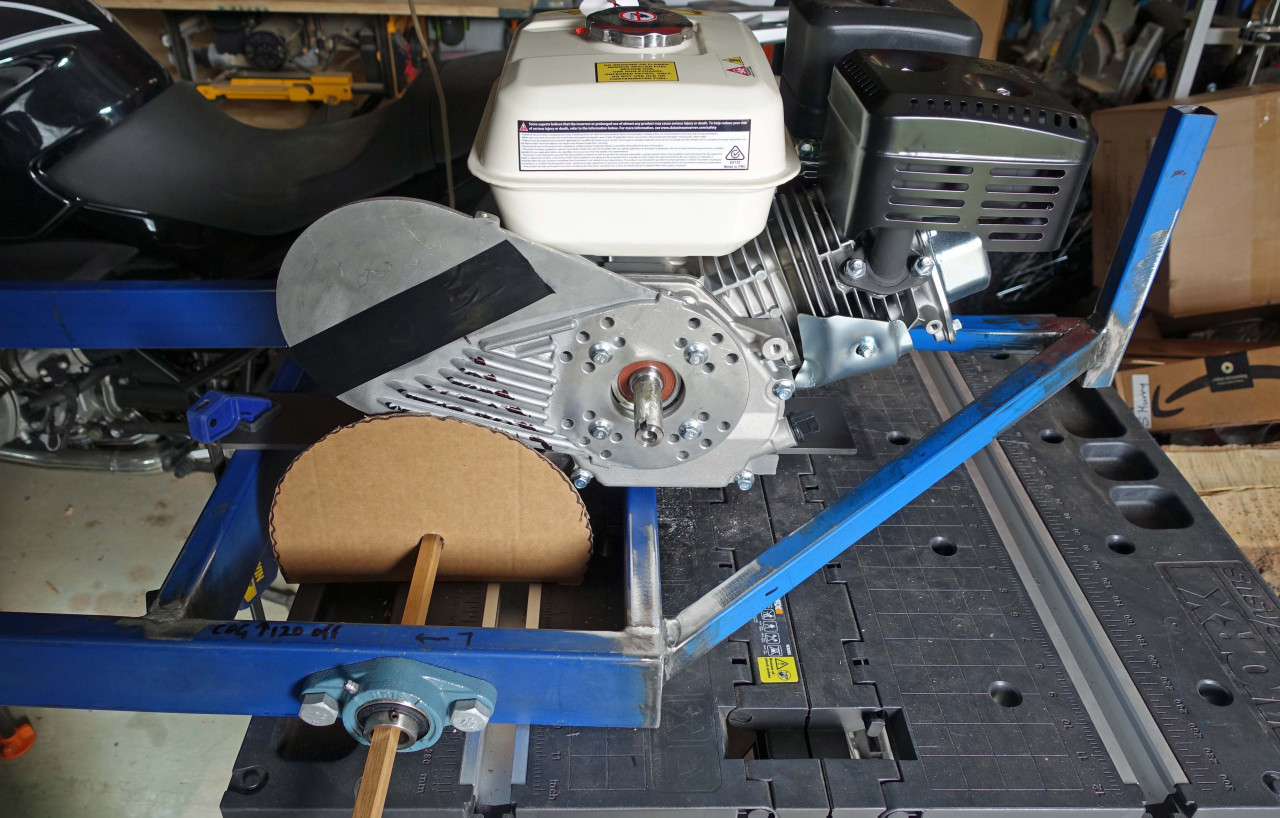
 Comments (1)
-
Yes I noticed those ribs get in the way too, kinda limits the available orientation of the torque converter. I think I determined that I needed to More ...
Post is under moderationStream item published successfully. Item will now be visible on your stream. -
There are no activities here yet